Cue the piano:
If you don’t want to see me…
I did a full one-eighty, crazy
Thinking ‘bout the way I was
– from Dua Lipa’s “Don’t Start Now”
I did a full one-eighty in my teaching, coaching, and consulting work. As recently as March, I advised clients that if they care about the product they’re building together, they need to be collocated and working together in real-time. If they’re working on a less important product, then at least try to work together in the same time zone. And if they’re maintaining an end-of-life product, then it doesn’t matter, do whatever you want.
This advice is obviously bogus. So what should we do today?
These days, I still advise people to maximize connection—individuals interacting together really well. Think about the people you work with and how to amplify your ability to connect with each other. Do everything possible to have an awesome team, and an awesome product will follow as a side effect (inspired by Jim and Michele McCarthy when they say, “Team == Product”). Then, and only then, choose the tools to amplify your team’s awesomeness. As the Manifesto for Agile Software Development guides us:: “… we have come to value individuals and interactions over processes and tools.”
Despite that, of course we need to use tools to do great work together. Which tools should we use to amplify our teams’ awesomeness? In this article, I’ll focus on tools to enhance real-time collaboration.
Video: Cameras On!
Collaborating via video is practically a given. It’s the next best thing to being together face-to-face in physical space. And I mean real video meetings, with cameras and microphones turned on so we can see each other, hear each other, and engage in authentic communication. Communication is more than the words we speak or write; real communication includes vocal inflection and body language. We don’t know precisely what percentage of communication is nonverbal. Still, when we limit ourselves solely to voice—or worse, to asynchronous text chat—we lose a great deal of information and connection.
When I arrive in a video meeting and people have their cameras turned off, I feel disconnected from them. If it were a face-to-face physical space meeting, would they have shown up with a paper bag over their head? That’s what camera-off feels like to me in online space: as if they’re embarrassed to be there, they don’t want anyone to know they’re there, they refuse even to try to connect with anyone else present. I feel like they’re disengaged, that they’re not “in” with the team, that we’re wasting our time together, and that they should check out.
So I invite everyone to turn on their cameras. I remind them that feedback is one of the most critical aspects of our work, and that faster and more information-rich feedback will help us connect more strongly and help us get better results together. The fastest form of feedback we have as humans is our facial expressions. It’s so easy to see from someone’s face whether they understood what we said, whether it made sense, or whether they disagree a little or a lot. We use that feedback to make adjustments to what we’re saying and how we’re saying it to ensure there are no misunderstandings and that we achieve our goals together. (Hmmm, that last sentence includes my definition of a protocol: a shared agreement that helps us avoid misunderstandings and accomplish our shared goals. Perhaps “Video Cameras Turned On” could be one of your team’s protocols.)
The Simplest Tools that Work
Faces and voices—video and audio—are a great start. To enhance the conversation, most of us need tools to visualize the conversation, the collaboration, and the ideas we are creating together. The best idea is to use the simplest tools that work: easy tools that everyone already knows how to use, and that are accessible to everyone everywhere in the world.
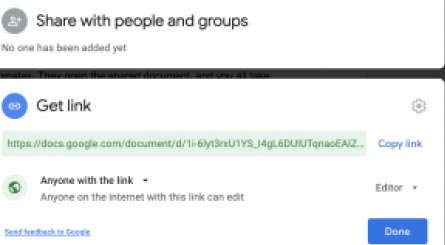
For most collaborations, a shared text editor is the best tool for the job. Most people know or can quickly learn Google Docs, so that’s my default recommendation. Just create a new document, click the Share button, change the Share settings to “Anyone with the link” – “Editor,” and share the link with your teammates. They open the shared document, and you all take notes and record ideas together in real-time. Easy!
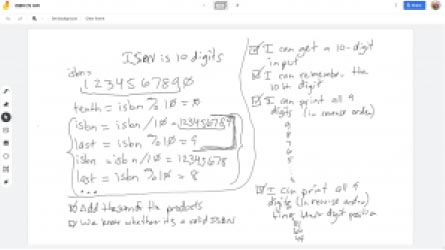
Typing text into a shared document is a great start, and we can amplify that goodness with tools that are more visual. Google Jamboard is a virtual whiteboard with make-believe pens and post-its, and it’s super easy to use. It works well in the web browser, and it’s easy to add hand-written content on a tablet with your finger or an electronic pen. (I use it on my iPad with a Pencil.) I’ve used it for everything from everyday collaboration with teammates to Open Space breakout sessions. Sometimes when traveling for work (pre-Covid-19), I use it to help my stepson with his homework. Zoom + Jamboard is almost like being in the same room together.
Miro for Awesomely Rich Collaboration
For my Agile Software Development course at Harvard, I needed to recreate the in-classroom learning experience without being in the classroom. Pre-Covid, almost every learning module included face-to-face hands-on learning activities. In Covid times, face-to-face is impossible. The challenge was to recreate highly interactive collaborative learning activities without being in physical space together.
Miro is the best tool for a challenge like this. I successfully transformed the entire course—and all of the other learning and work activities I use with clients—to work online.
I encourage you to add Miro to your toolset for online classes and work meetings. Here’s a set of my pre-made Miro templates. Just log in to your Miro account, open one of my canvases, and make your own copy of any template you want to use.
Team Transformation Canvas
Want an easy tool to help you start building the best team of your life?
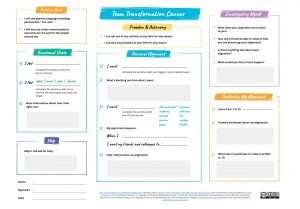
That’s what the Team Transformation Canvas is: a practical worksheet to help you and your teammates discover the best in each other and put it into action.
The canvas facilitates individual self-awareness of your current emotional state and desired personal outcomes. It helps you develop a deepened understanding of what drives your behaviors and actions. By identifying and owning these intrinsic motivations, you align your future actions with your most inherent needs, creating your unique pathway to professional and personal self-actualization. Finally, the canvas facilitates deep emotional and supportive connections with each other—the building blocks of a high-performance team.
You can find the Team Transformation Canvas in Miro’s Miroverse, or you can make a copy of my Team Transformation Canvas template.
Product Inception Canvas
Want an easy tool to help you start building great products that people love?
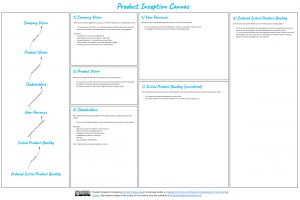
That’s exactly what the Product Inception Canvas is: a practical worksheet to help you, your business people, your stakeholders, and everyone else on your team discover exactly what to do next as you build and extend your product.
The Product Inception Canvas facilitates alignment among business people, product development teams, and stakeholders. We begin by identifying, discussing, and aligning on our company vision and product vision: Who are we? Why do we exist? How will the world be different and better because of the work we are doing? Next, we identify stakeholders and bring them to life as user personas: Who cares about the work we are doing? Who are they, really, including all their details? Finally, we put it all together into a product backlog—an ordered to-do list of everything we want to be true about our product in the future: What are the wants and needs of our stakeholders? What problems will we solve for them? Which problems should we solve first to maximize their joy?
You can find the Product Inception Canvas in Miro’s Miroverse, you can make a copy of my Product Inception Canvas template, or you can print a poster-size version of the Product Inception Canvas – Print Edition.
Doggy Estimating: Online
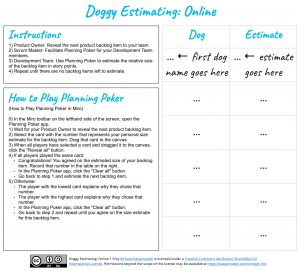
Given a product backlog and an agreement about what it means to get backlog items done, our next step is to estimate the size and complexity of the user stories on the backlog. I use the following two templates to help agile teams learn estimation techniques. The first learning activity is Doggy Estimating: Online. This is a 100% online version of the old Doggy Planning game from Tasty Cupcakes. I use this activity to help people learn how to estimate product backlog items one-at-a-time using Planning Poker.
You can find Doggy Estimating: Online in Miro’s Miroverse or make a copy of my Doggy Estimating: Online template.
Are you a teacher or coach? Ask me for a copy of the companion board, Doggy Estimating: Online – for Facilitators.
Perfection Game Retrospective: Online
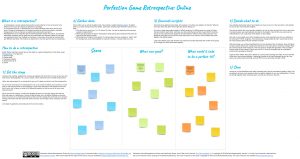
My favorite retrospective activity is Perfection Game. Perfection Game is the single best activity to give or receive feedback about anything.
The usual kind of feedback doesn’t work because it’s imposed on you, not done on request; you’re not ready for the feedback, so you resist it. The feedback is usually a negative experience: you didn’t do X properly, you didn’t do Y well enough, when you did Z it was a problem. And if you don’t take feedback, you’re labeled as a bad person in your company, “someone who doesn’t take feedback well.” All of this evokes your body’s fight-or-flight threat response: you can’t really hear the feedback, fight against it, you disconnect from your teammates.
Perfection Game is the antidote to the usual kind of feedback. It works because it’s all positive. In a Perfection Game retrospective, you reflect on your team and give your team a score from 1 to 10. Then you share a list of your team’s positive attributes—all the things that made them a good team during the last sprint. Finally, you share a list of actions you could take together to make your team a “perfect 10.”
Use this retrospective tool with your teammates to reflect on your performance together as a team and to agree on the most important improvements to make together on your way to becoming the best team that ever existed in the history of the universe.
You can find Perfection Game Retrospective: Online in Miro’s Miroverse or make a copy of my Perfection Game Retrospective: Online template.
Lean Coffee
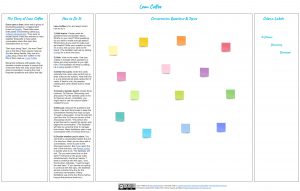
Lean Coffee is another great way to facilitate a productive meeting. I often use Lean Coffee to host conversations with groups of eight or fewer people. This Lean Coffee template includes all the instructions and tools you need to facilitate a great discussion.
You can find Lean Coffee in Miro’s Miroverse or make a copy of my Lean Coffee template.
Agile Point Game
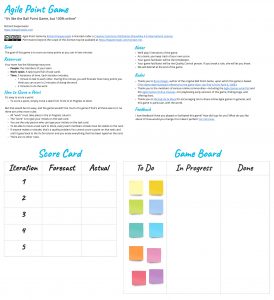
Agile Point Game: It’s like the Ball Point Game, but it’s 100% online.
Are you an Agile trainer, coach, or scrum master? Do you want an easy way to help your students learn the foundations of Agile software development? Then the Agile Point Game is for you.
The Agile Point Game is a 100% online version of Boris Gloger’s famous Ball Point Game. By playing this simple game together, your students learn about teamwork, collaboration, iterative work, forecasting, retrospectives, empirical process control, diversity and inclusion, the Tuckman model of team formation, continuous improvement, experimenting, inspect and adapt, Agile principles, psychological safety, and trust.
Best of all, they have fun! That means they really learn together. They think of Agile as something fun. They look back at your Agile training class as an enjoyable experience that brought them together as a team.
I use the Agile Point Game as the opening activity of every online Agile class I teach, including my courses at Harvard University and in industry. We reference this learning activity throughout the rest of the course: every element of the game is a stepping stone to deeper learning.
Enjoy this Agile learning game!
You can find the Agile Point Game in Miro’s Miroverse or make a copy of my Agile Point Game template.
User Story Template
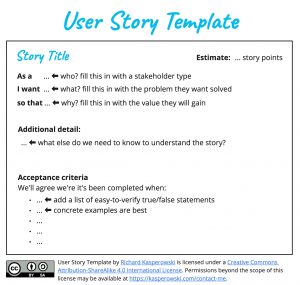
Use the Product Inception Canvas to align with your teammates on what we are building, who they are building it for, why it’s important, and what’s on the initial product backlog. Each one of those initial product backlog items is the title of a User Story, and now is the time to elaborate those initial product backlog items as fully articulated user stories.
A User Story is an agile way to articulate product “requirements.” It’s an invitation to a conversation with your teammates to ensure that we all understand who our stakeholders are, what they want, and why it’s important to them. We tell the user’s story out loud to our teammates, and we ask questions about anything we don’t understand. By retelling user stories, we get on the same page as each other. We gain the ability to tell each user’s story the same way. We get aligned with each other on what we’re going to build, and then we build it really well.
Fill in the blanks on this User Story Template, and you’ll be on your way to clearly communicating the who, what, and why of your product’s “requirements.”
You can find the User Story Template in Miro’s Miroverse or make a copy of my User Story Template template.
Animal Estimating: Online
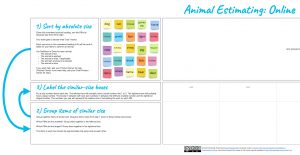 The other activity I use to help people learn estimating is Animal Estimating: Online. I use this one to help people learn how to estimate a large product backlog all-at-once using affinity grouping.
You can find Animal Estimating: Online in Miro’s Miroverse or make a copy of my Animal Estimating: Online template.
User Story Mapping Workshop
User story mapping is a way to explore exactly what to build. It is precisely the right tool for everyone involved in building a product—customers, business people, developers, and everyone else—to get all their great ideas out there, prioritize them, and get aligned with each other about exactly what to build next. This User Story Mapping Workshop template makes it easy for remote teams to go through all the steps to learn user story mapping and then apply the technique to their future amazing product.
You can find User Story Mapping Workshop in Miro’s Miroverse or make a copy of my User Story Mapping Workshop template.
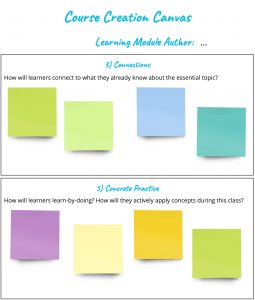
Course Creation Canvas
Delivering training is easy. But will your students remember it next week? And will they still be practicing their new skills months from now?
Chances are the answer is “no.” Most corporate training fails at its goal of effecting organizational change, and most training of any kind fails because of something called the Forgetting Curve. Without regular practice at new skills and concepts, people can’t remember what they learned in a class. It’s not their fault—it’s merely a human trait. So how do we facilitate effective learning? How can we support learners with effective courses, skills practice, and learning environments?
I spend a lot of time creating learning material and helping students learn and acquire all the knowledge and skills they want. Every time I create a new short course or learning module, I follow a pattern based on Sharon Bowman’s Training from the Back of the Room!. I created the Course Creation Canvas to make it easy for me—and more importantly, for you—to create great learning sessions. It works every time. It’s an easy way to create a great course for your students.
You can find the Course Creation Canvas in Miro’s Miroverse or make a copy of my Course Creation Canvas template.
Build Your Own Scrum: Online

After playing the Agile Point Game, my students are ready to learn Scrum. We use my online adaptation of Adam Weisbart’s Build Your Own Scrum. BYOS is, without a doubt, the best Scrum learning activity.
If you’d like a private preview of my Build Your Own Scrum: Online adaptation, send me a message. Meanwhile, I’ll be updating it to match the new Scrum Guide 2020.
Definition of Done & Ready
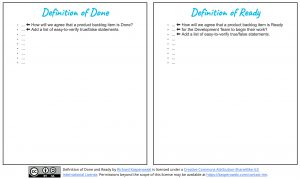
You’re well on your way to building an amazing product that people love. You used the Team Transformation Canvas to align with each other as teammates. You used the Product Inception Canvas to envision your future product. You conducted a User Story Mapping Workshop to create your initial product backlog. You elaborated your product backlog items using the User Story Template. Congratulations! Now it’s time to get to work building the product.
There are two more things you’ll want to do with your team to ensure you can build that amazing product effectively. You’ll want to agree with each other on what it means to have a high-quality finished product increment — you’ll want a Definition of Done.
And you’ll want to make sure you really understand what you’re about to build. To be ready to start doing the work, you’ll want a Definition of Ready.
Use the Definition of Done & Ready board to facilitate these two important team agreements and document your team’s definitions of Done and Ready.
To use the Definition of Done & Ready board, make a copy of my template.
PlusDelta Retrospective: Online
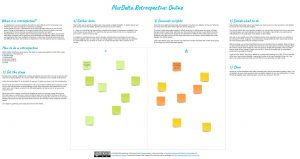
Whew, we made it to the end of the sprint! What’s the thing we do at the end of the sprint to inspect-and-adapt on ourselves as a team, to make our team the most amazing team that has ever existed in the history of the universe, building the most incredible highest quality product ever? That’s right, it’s time for a retrospective!
I have two retrospective templates that I like to share with my students and real work teams. The first is a simple PlusDelta Retrospective: Online. This is the activity where you and your teammates collectively identify the things that went well (“pluses”) and the things that you’d like to change (“deltas”). Then, together as a team, you use those data to guide the massive improvements you’ll make right away.
To use the PlusDelta Retrospective: Online, make a copy of my template.
Open Space: Online
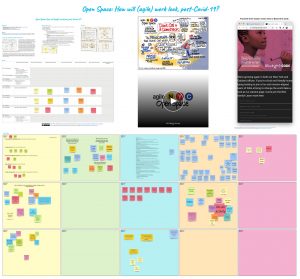
Open Space is a great way to hold a productive meeting for anywhere from 5 to 2000 people who have an important problem that they wanted to solve yesterday. If you want to help all those caring people combine their individual brains into a super-creative problem-solving machine, then Open Space is probably the right tool for you.
I’ve probably facilitated more Open Spaces than anyone else in the world, including an Open Space that lasted six weeks. I’ve taken all that experience and put it together into an Open Space: Online template that you can use to facilitate an OS event for any group of people. And when we get back to face-to-face events in physical space, you can use my Open Space Proceedings website to augment your Open Space event.
You can find Open Space: Online in Miro’s Miroverse or make a copy of my Open Space: Online template.
Live Class with Hand-Drawn Posters
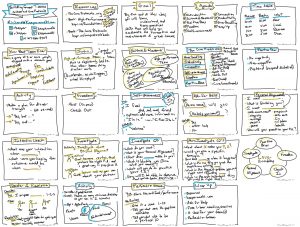
My physical-space classes are typically zero-PowerPoint fiestas. Yay! Instead of lecturing over slides that quickly disappear from the screen, I hand-draw notes on large poster paper. The learning benefits are myriad. For one thing, it ensures that I, as the teacher, go at human pace—not too fast for learners, and not too slow, either. When a teacher reads from pre-made PowerPoint (or Keynote or Google Slides) slides, they go so fast that it feels like they are assaulting their students with so much information so quickly that it hurts. Instead, I draw posters while I’m talking, guaranteeing that I’m going at the same pace that they can absorb the material.
The other significant benefit is that all the class material is visible to learners all the time. We stick the posters to the classroom walls, basically wallpapering the room with information. If someone wants a little reminder about something, all they have to do is look at the right poster on the right wall, and there it is; they’re all set. This contrasts with ephemeral PowerPoint slides that disappear into the ether, leaving students bewildered about what happened earlier in the course.
To reproduce this in my online classes, I use my Live Class with Hand-Drawn Posters template. Before class starts, I make a copy of the template and customize it for the class I’m about to teach. I share the Miro link with my students so they can navigate around the notes and zoom in on whatever they want to see at the moment. I screen-share what I’m live-drawing to help them focus on that moment’s learning segment, but they’re free to refer back to whatever content they want to see whenever they want to see it. And they can keep that copy of the classroom visuals as their notes forever.
To use Live Class with Hand-Drawn Posters, make a copy of my template.
What’s Next for You?
I’m hopeful these Miro templates will be great starting points for you, your learners, and your colleagues. Let me know what works for and what improvements we could make to these templates. If you want any help, just ask.